- Brand Name:
- Stopwatch and Accessories:
- Model Number:
- Product style:
- Weight:
- Size:
- Power supply:
- Application:
- Feature 1:
- Feature 2:
- Feature 3:
- Fit position:
Computer Installation
Push the computer along the chute, the button stand fix the computer and hold. Removing it just need to pull it out in reverse direction along the chute. Check the installation: Turn the front wheel to run, and look to the screen to confirm if it's got signal. If there is no signal or the reaction is not sensitive please adjust the relative location of Sensor and Magnet slightly.
20 Functions
- Memory functions
- Speed tension (3 km per grip)
- Two bicycle using
- SPD Current speed (0-99.9)
- ODO Odometer
- DST Trip distance
- MXS Max speed
- AVS Average speed
- TM Trip riding time
- CLOCK 12H / 24H
- SW Stop watch
- CAL Calories Level
- FAT Fat burn measurement
- TEM Temperature
- Backlight
- Low power indicator
- Maintenance alert
- KM, M selectable
- Setting tire circumference and ODO
- Auto off
Battery Installation
Remove the battery cover and put a piece of CR2032 battery into the case. Notice: Positive pole (+) should be set upwards. Then cover the battery cover and screw down.
Pedestal Installation
In the accessories pack there is a strap which can be used to fasten the seat onto the handlebar, as well we can use the back-up plate to fasten it.
Sensor and Magnet Installation
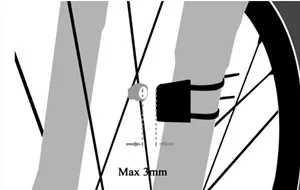
Install the sensor onto the front fork of bicycle, and the magnet is installed onto the steel wire at the same side of wheel. Sensor can be underlaid with back-up plate and use the strap to fasten onto the front fork. It needs to be installed in 60cm distance from the computer, as the picture shows. Adjust the comparative location of Sensor and Magnet. The plane must face to the inductor. Keep the space to be 1.5mm. Magnet can not be set to the center of Sensor face-to-face, it's better with the head or tail of Sensor

Setting Steps
1 Put the battery on - Setting KM, M, press SET button to choose and press MODE button to confirm. 1 mile = 1.609 km.
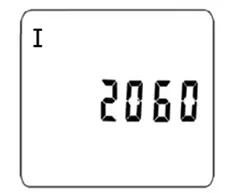
2 Wheel I perimeter setting, the screen shows 2060 (perimeter is 2060 mm). Setting the flashing number from right to left, press SET button to change the number and press MODE button to confirm.
3 Wheel II perimeter setting, the screen shows 1860 (perimeter is 1860 mm). Setting the flashing number from right to left, press SET button to change the number and press MODE button to confirm.
4 Weight setting. Screen shows K065 and "K" flashing.First
choose kilogram K or Pound L then setting the value. Press
SET button to choose and press MODE button to confirm.
5 Bicycle I Maintenance setting, screen shows 0200, setting from right to left. Press SET button to change the flashing number and press MODE button to confirm.
6 Bicycle II Maintenance setting, screen shows 0800, setting from right to left. Press SET button to change the flashing number and press MODE button to confirm.
From now on you have finished the setting, and you can
ride your bike. Default bike is bike I. If you want to reset
please press left and right key for 6 seconds at the same
time, and the steps are the same with above.
Tire circumference setting and perimeter comparison

Wheel I perimeter setting, the screen shows 2060 (perimeter is 2060 mm) .Setting the flashing number from right to left,
press SET button to change the number and press MODE button to confirm.


Wheel II perimeter setting, the screen shows 1860 (perimeter is 1860 mm) .Setting the flashing number from right to left,
press SET button to change the number and press MODE button to confirm.
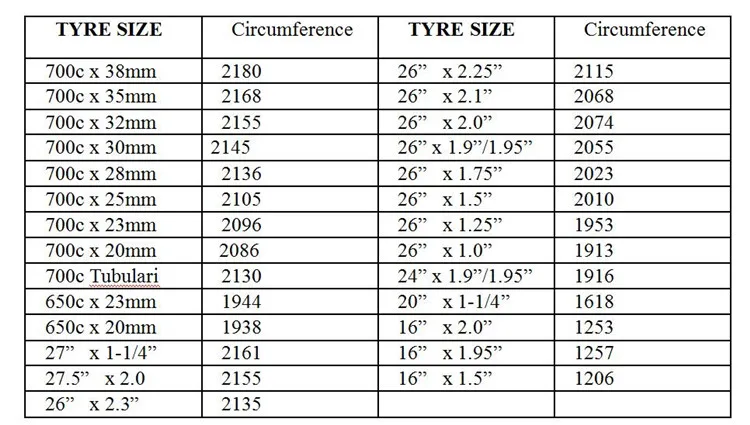
Method 1: Follow this table wheel spec chart to select the perimeter, press the SET button to change the value, press
MODE to confirm, right to left to set the desired value.

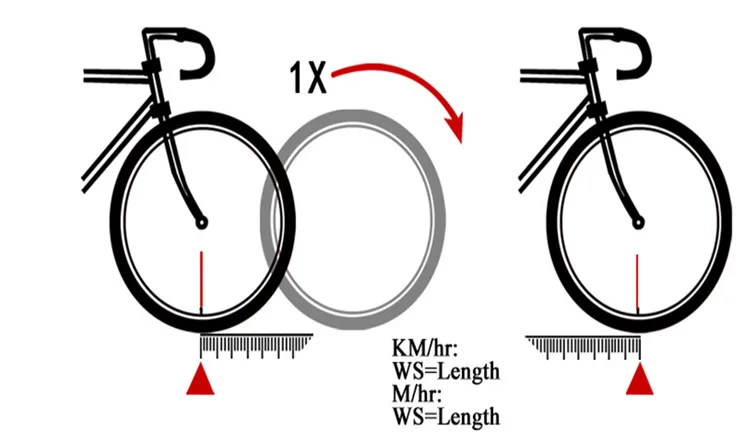
You can also measure it by yourself by the following ways:
Auto off
Current speed
Speed tension
Screen will show a standby when you are riding. Speed up, it goes high. Speed down, it goes short.
Low power indicator
Two Bicycle I / II using
Memory function

You can also measure it by yourself by the following ways:
Method 2: First make a mark on ground when the nozzle is on the below, then make the wheel run once the gas mozzle on
the below again please mark, and measure the distance between the two marks you can get your wheel perimeter.if the
dust is 1615 then you should input 1615.
(you can also measure the diameter and multiply 3.14 ti get the perimeter.)


Method 3: Measure the diameter and multiply 3.14 to get the perimeter.if the result is 1615 meter,
then you shoule input 1615.


ODO, CLOCK and TEM unit Setting
Under ODO - TEM - CLOCK mode, press SET button ODO flashing, press SET button again TEM flashing, press SET button again Clock icon flashing. When ODO flashing, press SET button for 3 seconds to set ODO value. Press the SET button change the number, press MODE button to confirm it, set from right to left number.
When TEM flashing, press SET button for 3 seconds to set the temperature unit. Press SET button to change / / ℉, press the MODE button to confirm it. When Clock icon flashing, press SET button for 3 seconds to set the date. Press the SET button to change time number, press MODE button to confirm it.
Then press SET button to change 12H / 24H, press MODE button to confirm it. Press SET button to change time number, press MODE button to confirm it.
DST, AVS, MXS, TM, CAL and FAT clear to zero
Under DST - CAL - TM or DST - FAT - SW mode, press SET button for 5 seconds to clear DST, AVS, MXS, TM, CAL and FAT value to zero.
Backlight
During 17: 00-07: 00, screen will be lighted up for 4 seconds
when you press any key. But if you want the screen always
lighting at any time, press both SET and MODE button for 1
seconds to keep the screen always lighting up. Press SET and
MODE button for 1 seconds again to cancel it
Stop watch
Under DST - FAT - SW mode, press SET
button to shart Stop watch press again to paus,
then press MODE button to clear tozero.
It ranges from 0:00:00 to 9:59:59.
Auto off
After 300 seconds no signal inputs the computer, the screen will turn into OFF state with only clock and date display. It will be restart when you press any button.
Maintenance Alert
Under ODO - TEM - CLOCK mode, when distance value reaches to the maintenance setting value, the spanner icon will be flashing in the screen, press the SET button for 3 seconds to cancel it.
Current speed
Screen will show current speed only when you are riding. Precision is 0.1KM / h. Range at 0 ~ 99.9 KM / h (M / h) .Screen shows MXS or AVS when you are not riding
Speed tension
Screen will show a standby when you are riding. Speed up, it goes high. Speed down, it goes short.


ليست هناك تعليقات:
إرسال تعليق